Introduction
For the coursework of the Spatial Computing module in my final year of university, the task was to create an experience that allowed the user to interact using their bodies. For my project, the decision was made to pursue virtual reality due to a personal interest in the field. I sought to explore the cornerstone features of VR to truly delve into what makes spatial computing unique and innovative compared to traditional systems. Using this methodology, world traversal and object interaction were pinpointed as two of the most distinctive features that VR systems have to offer, and as such, they became the focal points around which I would base my project. It then became a necessity to formulate a project idea that could effectively harness these two features to create a coherent and immersive VR experience which culminated in the decision to create a virtual escape room where the user would explore and interact with their surroundings to solve a number of puzzles that would lead to their escape.
Preparation
After the decision was made to develop a game, the next step was to determine the platform the project would be built around. Given the diverse range of VR systems available, ranging from basic smartphone setups to full room-scale environments, this project looked to find a middle-ground that allowed for an immersive VR experience without requiring dedicated infrastructure to be put in place. For this purpose, the Meta Quest 2 headset presented itself as an ideal option for several reasons. Firstly, it is specifically geared towards gaming purposes, aligning perfectly with the project’s concept. Secondly, its inside-out tracking capabilities remove the need for external base stations, which simplifies setup and frees the device to be used portably. Finally, the accessibility aspect of it being a device already in my possession made it a very convenient device to develop for, making it an easy choice for this project.
For the programmatic side of this project, it was important to select a framework that had dedicated VR capabilities in order to ensure a smooth development cycle. The most obvious choice in this regard were either of the two major engines in the game development space, Unity and Unreal. After assessing both options, it was Unity that was eventually settled on as the foundation of the project, with the key selling points being the plethora of documentation to assist with development, and the convenience of the XR interaction toolkit library that provides everything required to get started developing in VR, allowing for development efforts to be concentrated on the creation of the game mechanics rather than the configuration of the VR hardware, saving a significant amount of time that could then be reinvested into the project to improve the overall functionality.
Development
With all the necessary preparations in place project development could commence. This began by first putting the groundwork in place to translate the real-world movements of the Meta Quest 2 and its controllers into the virtual environment. Fortunately, the XR interaction toolkit manages most of the work for this endeavour with the XR rig object and VR starter asset pack bundled with the framework, providing all the necessary configuration files to get started with VR tracking relatively quickly and easily.
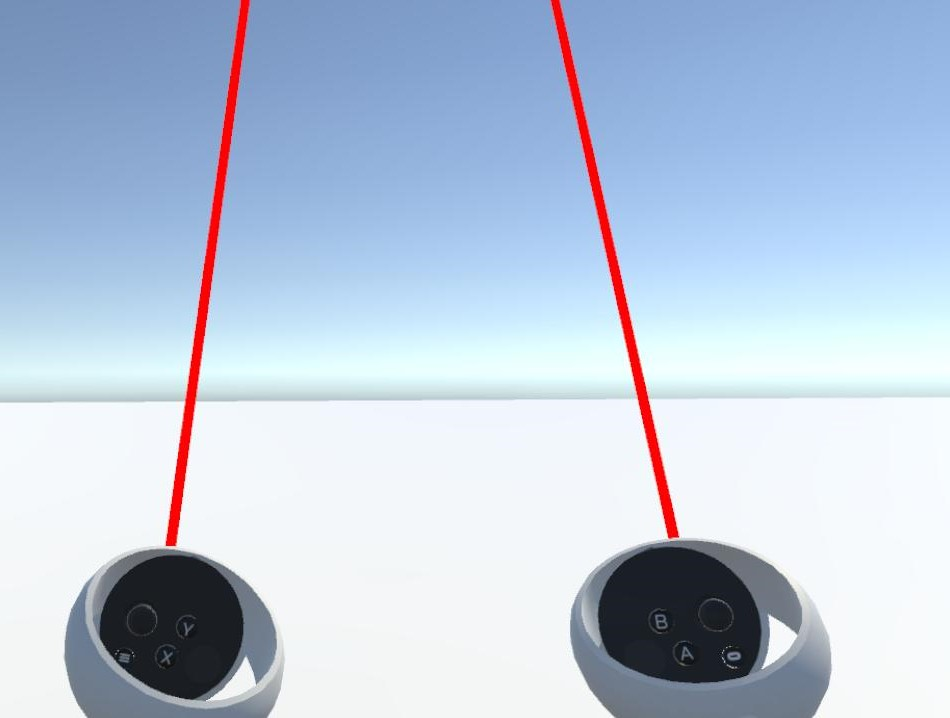 Default Controller Configuration
One area that needs to be altered from the default configuration, however, is the ray casts projecting from the controllers. While they have their purpose, for an escape room more close quarters contact is preferable to invoke a sense of realism and for this reason, all components associated with the ray casts were instead replaced with a direct interactor on the right hand to manage grabbing objects within a configurable radius, and a collider object on the left hand that gives the player the ability to push and press objects, the two mechanics that would form the basis for the escape room.
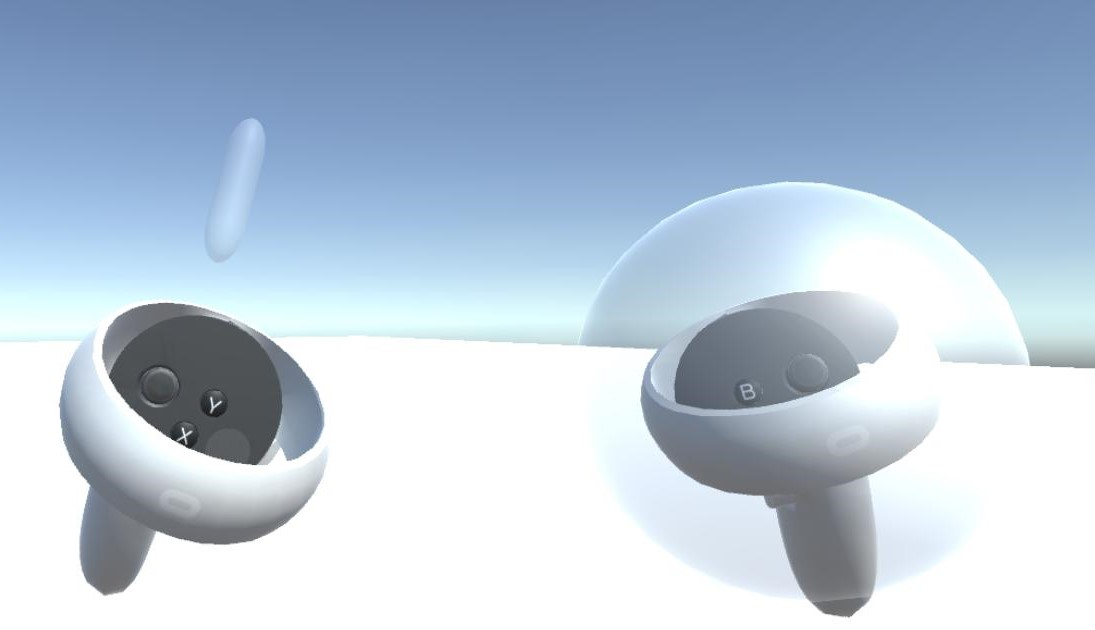 Modified Controller Configuration
In the absence of room-scale VR, an alternative method needed to be established for player movement. Here, inspiration was taken from traditional video game control methods with a continuous movement script bound to the left controller analogue stick for traversal and a continuous turn script bound to the right controller analogue stick that works in conjunction with headset tracking for 360-degree camera movement. While there is a sacrifice to realism with this approach, it carries the advantage of accessibility and flexibility as the game can be played from a stationary position rather than being limited to a large open play space.
With the foundation of the project put into place, the focus could be shifted to formulating a plan on the types of puzzles the escape room would contain and how the room would flow to provide a coherent user experience. The general idea was for each of the puzzles to explore a different aspect of the VR experience to provide a well-rounded experience of what VR has to offer, keeping the aforementioned traversal and interaction features in mind throughout the design process. This resulted in a rough plan detailing each step of the puzzle process, from spawn to escape, from which a room could be built around to mould the gameplay experience.
The first puzzle planned was a location task which required the player to locate a lever that was hidden behind a piece of wall art. The first phase to this implementation was the addition of an XR grab interactable component to allow the player to grab and move the object, this component did allow for the player to successfully uncover the lever, however it was far from a smooth experience as the art immediately clipped into the player’s grip on connection, and eventually got dropped to the floor as the player looked to progress which felt unnatural and clunky. To remedy this issue, a hinge joint was added to the wall art object to provide a door-like effect as the player uncovers the crevice, which, in addition to some damping, provided a more elegant and life-like experience.
 Before
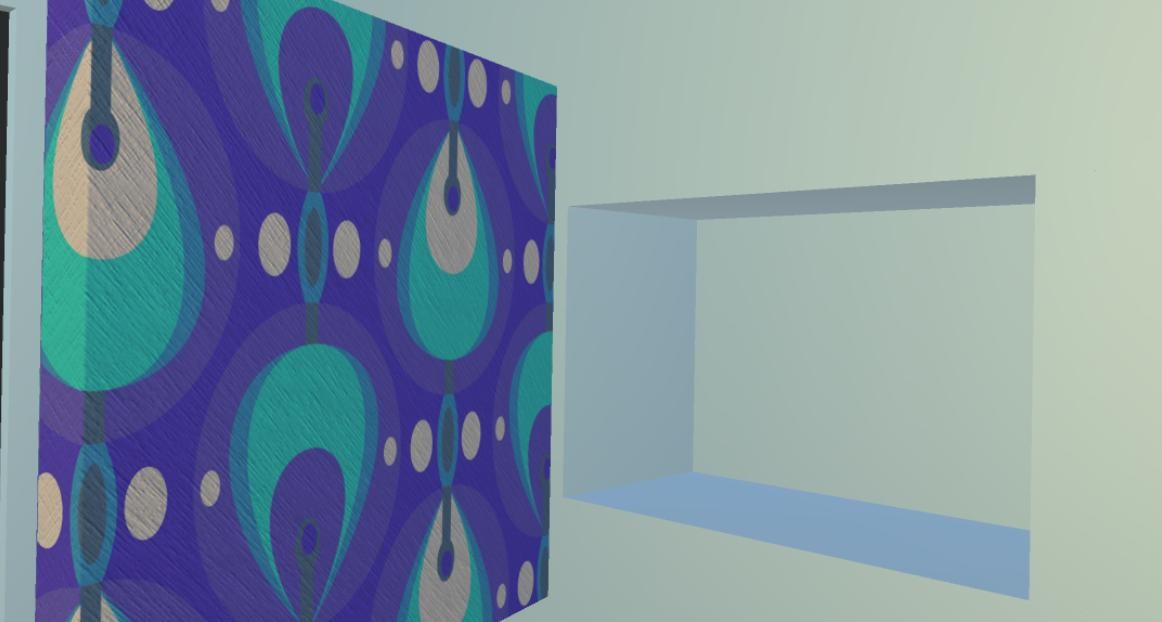 After
After
With the mechanics in place to expose the lever, the next natural step of development was implementing its movement and mechanics. The movement aspect was again addressed with an XR grab interactable in conjunction with a hinge joint, much like the wall art, but with a small alteration in the colliders section of the grab interactable to make the pommel of the lever the focal point rather than the handle, which the grab interactable script is attached to, for a more natural player-object interaction. However, the starting point of the lever still remains an issue as, by default, it sat in the centre of the container rather than its intended starting position at the top. While rotating the lever in the editor was one solution to this problem, it came at the expense of disrupting the preset anchor point, potentially compromising the realism of the lever, so instead the decision was made to implement a small script that would alter the position of the lever to its correct placement on program startup after the hinge joint had already been established, circumventing this issue entirely.
| |

The idea for the functionality of the lever was to translate its rotational movement into the linear movement of an object elsewhere in the room to reveal a second hidden crevice. To achieve this, the rotation of the lever needed to be represented as a percentage of its total range of motion using a range normalisation equation. It was here that a flaw was found in the initial plan as the use of Euler angles could only differentiate the objects relative to their initial, central position, making the percentage calculations impossible as both directions of the lever would read as 45 degrees. To remedy this issue, the switch was made to an approach that used quaternions with the minimum and maximum rotation values explicitly declared. Although a less flexible solution, it solved this issue and so it was maintained through to the final version. Once the percentage had been declared, moving the object became as simple as multiplying the percentage decimal by the declared range of movement and adding it to the moving object’s starting position, which is recorded on initialisation.
Behind the object moved by the lever, there exists a safe that requires a six-digit pin to unlock. The first stage of implementing the mechanics for this feature was to add the ability for the buttons to be pressed by the collider attached to the player’s left hand. A configurable joint was chosen for this task as the ability to lock the movement of the button to a single axis, as well as choose how much movement it will tolerate, meant it had all the functionality needed to make a convincing button. The next step was to detect the key presses and generate a relevant result based on what button was pressed, which was achieved by adding a collider behind the keypad that the buttons would come into contact with when pressed. By reading the name of the button, it can be determined what button has been pressed, and the relevant output can be generated accordingly. To provide visual feedback on this process, a ‘TextMesh Pro’ object was added on top the keypad with a custom font to create a display effect for the keypad which would update to reflect the user entered combination until the enter button was pressed where it would then display either ‘Unlocked’ or ‘Incorrect’ depending on whether the combination entered by the player matches the preset PIN. Once unlocked, the hinge joint controlling the door of the safe was altered to enable the grab interactable, allowing the player to open the safe and retrieve the key from inside.
Finally, the mechanism needed to be put in place to unlock the exit door using the key. In its locked state, the door has a slight amount of movement to represent a locked door, so the aim of the unlocking mechanism was to increase the limits of the hinge joint on key entry to an amount that allows the player to fully open the door. For this, an invisible box collider was placed over the lock portion of the door asset, and a script was written that specifically looked for a specific object entering its collision zone before activity, with the trigger, in this instance, being the key. Once triggered, an unlocking sound effect is played alongside the hinge limit increase to provide a fully functional door with aural feedback.
With all the major mechanics in place, a room needed to be built around the mechanics to form an environment for the player to explore. For the most part, this included using free assets from the Unity asset store to create a pleasant living room environment. However, there was also a desire to add a problem-solving step into the room design itself to make exploration an even more important part of the puzzle experience. To achieve this, it was decided that the PIN code for the safe would need to be deciphered using room props. The first stage of this was adding a drawer using a configurable joint to house a note suggesting that the code the player is looking for is based on a date, promoting the need for the player to search their environment to solve the notes clue. On discovery of a marked calendar, the player could convert the date into a six-digit code that corresponded to the code needed to unlock the safe, granting them access.
Once the main body room was finished, all that was missing was a sense of competition to incentivise the player to try escape as quickly as possible. To address this, a timer was added beyond the escape door that would only stop once the key had been entered into the door. This feature provides the player with a quantifiable metric that can be used for personal improvement and friendly competition purposes while also acting as a finish line to congratulate the player for solving all of the puzzles presented to them. As the stoppage of the timer is intrinsically linked to the unlocking of the escape door and the logic was quite simple in nature, only requiring the alteration of a Boolean value, it was a reasonable design decision to treat the timer as an additional feature of the door unlock trigger and therefore house all the necessary logic within the same script.

Final Analysis
Assessing the end product against the initial criteria, I believe that the project met the goals set out for it in the beginning and, as such, was a mostly successful endeavour. However, certain aspects of the project remain that could do with further refinement to create a more immersive and gratifying VR gaming experience, the first of which is the implementation of harder, more complex puzzles. This version of the project prioritised showcasing VR features in its puzzle design, a philosophy that helped the game take full advantage of VR’s unique functionality but also left plenty of room for future revisions to begin to expand the puzzle design in more interesting ways to provide a greater sense of accomplishment to the player.
The other feature that I believe would add great value to this project is the representation of the VR controllers as interactive VR hands. This feature would open up the possibility of creating a deeper level of immersion by allowing the player to engage with the virtual environment using natural hand movements that would dynamically alter functionality based on the hand pose of the user. For this application, this would include a pointed finger allowing for button presses while a clasped hand would be the method for grabbing objects. This feature was experimented with during development, however achieving a convincing effect proved to be a complex endeavour so instead of the inclusion of a half-baked feature, the decision was made to revert back to the VR controller model.