NAS
Configuration
The primary reason for the construction of this server was to operate as network storage as before my data was scattered across multiple drives with zero backup which was not only an inconvenience when it came to access, but also carried a high risk of data loss should one of the many drives fail.
While cloud storage was one way of sorting this issue without the upfront cost, this raised concerns for both reliability as I would be required to have an internet connection at all times to access my data, and for privacy as having unencrypted copies of my data on a company data centre gives no guarantees that the data isn’t being used for alternative purposes. Thus I preferred a local NAS solution.
To operate my NAS I chose TrueNAS core as my research revealed that its immense popularity came as a result of its reliability and collection of features. The more recent TrueNAS Scale was also considered but I decided against it as I didn’t need any of the app features it was offering as I was set to run my own docker host, so to minimise complexity I stuck with the tried and true TrueNAS core.
Configuration of the NAS was relatively simple, I passed the sata controller which was responsible for all of my drives into the TrueNAS VM and structured them in RAID Z1 giving two drives worth of storage, with room for a drive to fail with no data loss. I then created a data pool which I opened up using an SMB share, allowing any device on my local network to access the data, assuming it could provide the correct credentials.
As is good data hygiene, it was important to establish an off-site backup for my data in case of server disaster/failure, this is where a cloud backup became a good idea. Unlike before, this will not be my primary method of accessing my data, and the cloud provider will only see an encrypted copy of my data, leaving no concerns about privacy. Having this off-site backup brings me peace of mind that at least one copy of my data will always be retrievable. The provider I selected was the ever popular Backblaze B2 as they provided cheap, reliable storage which was everything I needed for a backup which I ideally will not have to touch very often.
As a final safety procedure, I also set up my TrueNAS instance to be able to send emails should anything go wrong with the server, such as a hard drive failure. A dedicated Gmail account was set up for this purpose with its only job being to send emails related to the server’s operations. This makes it simple for me to mark incoming emails from that address as important to ensure maximum visibility amongst the rest of my email inbox on my personal account.
Services
Host
As the backbone of my HomeLab, I turned to Docker as a resource-efficient way to host a variety of isolated services. Instead of spinning up full VMs with all their associated overhead, Docker lets me run everything on a shared kernel while still keeping each service cleanly isolated. To manage these containers more easily, I looked towards Docker Compose where defining all my services in a single, readable YAML file makes configuration changes easy, and being able to bring up or shut down my entire stack with a single command has made administration much simpler.
To host the docker instance, I chose an Ubuntu VM. While I did also see many people opting for an unprivileged LXC for a resource efficient host, I decided against this as I valued the complete isolation that a VM provided as well as some of the extra creature comforts like backups being incredibly simple. The only downside of the VM approach was the increased resource requirements but my server is sufficiently powerful to where this really isn’t an issue I need to concern myself with. As for the host OS, I settled on Ubuntu Server for a few reasons. On a technical level, Debian-based distributions are known for stability which is a desirable property, so a GUIless distribution based on Debian is generally a solid choice. The reason I picked Ubuntu over Debian however, was familiarity. From past experiences hosting Minecraft servers on old PCs, Ubuntu server is something I have used in the past regularly and I simply saw no reason to deviate from an OS that has been reliable for me in the past.
Home Assistant
A smart home has always been something I’ve seen as a great convenience in day to day life. However, many of these devices are subject to subpar security protocols which is a major issue when they require connections to the open internet. For this reason, I made the jump to using Home Assistant as an open source, local alternative to controlling all of my smart devices. This began in the form of a Raspberry Pi but now with the new server available, it was time to transition my instance.
There were two major directions I could’ve taken this transition:
- Run Home Assistant OS in a VM
- Run Home Assistant as a docker container
Option 1 was by far the easier choice, offering access to automatic updates and the home assistant add-on store, but I ultimately went towards the container route as I prefer to take a more granular, hands-on approach to my system and this is exactly what docker offered me.
As is the standard when spinning up a new docker container, I looked towards the official docker compose snippet provided by the Open Home foundation as my starting point which gave me the following:
| |
This compose acted as a good starting point, but immediately I noticed several concerning sections that gave the container far more privileges than I’d like. Starting with the fact that by default this would be a privileged container. This appears to be so it can easily detect system devices such as a ZigBee adapter for an easy user experience, but this can also be achieved by manually passing the device into the docker compose configuration and so this the privileged: True line was removed entirely.
The next line under scrutiny was the fact that the container looked to run its network in host mode with network_mode: host. My research revealed this to be another choice of convenience as it allows easy discoverability of devices that utilise mDNS or UPnP. However, this is not a feature I’m particularly interested in as I have no issue with manually adding my devices via IP address, and if it is a feature that becomes important to me in the future, I will look to explore avenues like reflectors to restore mDNS capability. But until that moment, I prefer to keep Home Assistant more isolated in a bridge network mode.
The final line under scrutiny was /run/dbus:/run/dbus:ro. This line is simply to grant Home Assistant access to Bluetooth devices. The server Home Assistant is running on has no Bluetooth capabilities as there is simply no need as no smart devices in my network require Bluetooth to operate. As a result of this, I am also free to remove this line from the configuration to keep access privileges to a minimum. From here I was happy to move forward with this variation of the compose which left me free to enter a bind mount for the Home Assistant files, and my timezone, completing my Home Assistant configuration.
Mosquitto
In smart home configuration, MQTT messaging is a common theme as its status as a lightweight publish/subscribe protocol ticks a lot of boxes for IoT devices. For this reason, an MQTT broker was an essential addition to my stack. While running my Home Assistant OS instance on the Raspberry Pi, this was facilitated through the use of the Mosquitto add-on from inside the OS, which provided stable, reliable communications throughout its entire operating time. Now in the transition to docker, I simply did not see a reason to change what wasn’t broken, Mosquitto is open-source, lightweight, and natively supports being ran as a docker container and so was as equally perfect for my situation as the first time, making it an easy choice.
Setup for Mosquitto was also very straightforward, I was able to follow documentation practically to the letter for the entire compose entry and configuration file which provided an authenticated MQTT broker that was perfectly suitable for all my needs. The only minor change I made throughout the entire process was the removal of access to port 9001 as this port is solely for WebSockets which as of right now I do not use and so there is no purpose in providing this port unless things change where I can then just simply restore access to the port.
| |
Zigbee2MQTT
For its energy efficiency and reliable meshing system, ZigBee has been a go-to protocol for many of my smart devices. This has meant that I have needed a way for the ZigBee coordinator to interact with Home Assistant.
On my original Raspberry Pi setup, I took the easy approach of using ZHA, the ZigBee integration built into Home Assistant, and this worked well enough. However, ZigBee2MQTT is another approach that I have seen often recommended for its improved compatibility and customisation and since I am starting from scratch, I decided to make the switch since I was starting fresh.
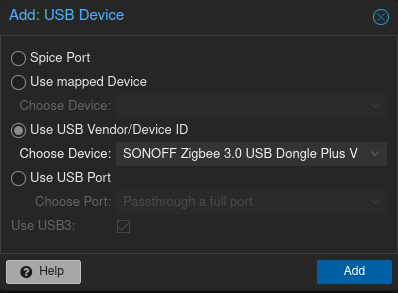
The key to getting this container up and running revolved around granting the Ubuntu VM and Z2M container access to the USB Zigbee Coordinator. For the VM, Proxmox made it simple to add the detected coordinator using the device’s detected name.
Inside the VM, running the command ls -l /dev/serial/by-id/ allowed me to locate the exact ID of the Zigbee Dongle that I needed to pass into the container through its environmental variables. While I was altering the compose, I also took the liberty of altering its external port as by default it occupied 8080 which is a common port that other services may wish to use, that would only serve to cause issues in the future. I also removed the container’s access to udev as this is solely for automatic USB device discovery and in this case, I would be explicitly passing in the coordinator anyway so this permission was unnecessary.
This allowed me to then move on to configuration file required for Z2M. To get started with this, the Z2M documentation provides a useful tool to customise a copy-and-pasteable configuration to get yourself started and so after entering the basic details such as the IP address of my MQTT broker and the address of my Zigbee Coordinator, this put me off to a solid start. However, I explicitly made sure that my MQTT broker requires authentication which the default config did not account for, so I had to manually add these lines before starting the container otherwise it would not have functioned correctly. I further tweaked the default config bu adding frontend authentication, although this service is and only ever shall be local only, it felt as if this was good practice so I implemented it regardless.
With all configuration complete, there was one final issue I ran into on setup: The EZNet firmware that came pre-flashed on my ZigBee coordinator was unsupported by Z2M as support has instead been focused around the ’ember’ firmware which offers better stability and compatibility with devices. With this information, it seemed like upgrading the firmware of my coordinator was a good idea anyway so I followed through using the web flash tool provided by Silabs. The process was quick and painless, and once the coordinator had been reattached to my server, Z2M worked perfectly, allowing me to pair all of my Zigbee devices. For added convenience, enabling the homeassistant: true flag earlier in the configuration allowed HomeAssistant to automatically detect all of the devices paired to Z2M over the MQTT integration, leaving me with no further setup required to start controlling my smart devices.
Whats Up Docker
While general maintenance is incredibly important, manually keeping track of and applying updates is a tedious task that really could be automated. This is why I brought “What’s Up Docker” (WUD) into my stack. Traditionally, many people have looked towards Watchtower to update their containers, however, this project has not been maintained in many years and so it felt wise to steer clear and pick a similar but more regularly maintained solution, which is what WUD provided.
All the setup for WUD is done inside of its environmental variables of its compose entry so I started out with adding some authentication for the same reasons as Z2M, it’s not strictly necessary for my purposes as WUD will forever remain local only, but it’s simply just good practice to secure services so there was no reason not to.
| |
I could then move on to setting up my triggers for updates. For my first trigger, I configured my SMTP service so WUD can send me nightly emails about what containers need updating. This was mostly just an exercise in filling out the desired values based off an online template, and once back inside the WUD interface, I was able to test this trigger to verify that it was working exactly as anticipated.
| |
For my second trigger, I configured an auto-updater based on the contents of my docker-compose.yml. I was acutely aware of the risk that this carried as any given update has the ability to bring down the service whether that be due to a bug, or unrealised breaking changes. For this reason I specifically limited my auto-updater to minor updates only, while larger updates that carry a greater risk of causing outages remain requiring manual updates. For my personal use case this strikes the perfect middle ground between convenience and reliability. I also made sure to include docker prune into my update automation to ensure that my disk didn’t get filled up overtime by old images.
| |
This particular trigger does also make use of my docker-compose file to read the names of the containers update accordingly, and for this reason I had to grant WUD read access to my docker-compose using this line
| |
The final step of the process was configuring my schedule, WUD uses cron formatting and so I was able to easily configure WUD to run at 4am every morning, outside of the hours that I would ever be using my services.
| |